Sunday, June 29, 2014

Sprouts and Microgreens

A few weeks ago, my dad bought me a big sack of mung beans online - I like them WAY more than lentils, and they make a killer hummus. He needed to pad his order to get free shipping, thank you dad!
Anyhow, I started looking online for how to sprout these things, because a kilogram of mung beans makes enough hummus to make anyone sick. And I fell into the rabbit hole of sprouting.
A bit of a confession here - I'm terrible at gardening. I hate sunshine, dirt, bugs, and weeds. Nature isn't my thing. I love me some chemicals, but I also like fresh food without the chemicals. If you're like me, you'll love sprouting.

The most popular way to start sprouts is in a quart mason jar, but for my mung beans I started with a recycled ice cream tub. I put a couple of orphaned lids for plastic containers in the bottom, with holes poked in them for drainage, then a couple of paper towels, and 1/4 cup of soaked beans (soaked overnight), and then a couple more paper towels. It's dry here, so the paper towels helped keep the beans moist but not wet. And, I kept them covered with a linen dishtowel while they were growing - mung beans like it dark. Here's that result after just 4 days:

They had a much better flavor than bean sprouts from the store, sweet and a bit like snow peas. But the set up was a little fiddly - they have to be thoroughly rinsed a couple of times per day, there were always a few that tried to escape during the process. I also tried it in jars, but the sprouts in jars tended to be shorter and more curly. The best way I tried was in recycled clamshells from strawberries. In each cleaned clamshell, I put a paper towel (to keep the little beans from escaping through the drainage holes, a couple of tablespoons of soaked beans, and then another paper towel. The second paper towel probably isn't necessary if you're in a humid climate. It was really easy to just pop open the lid, rinse, and then close it back up and set it back on a tray to drain. Here's the result:

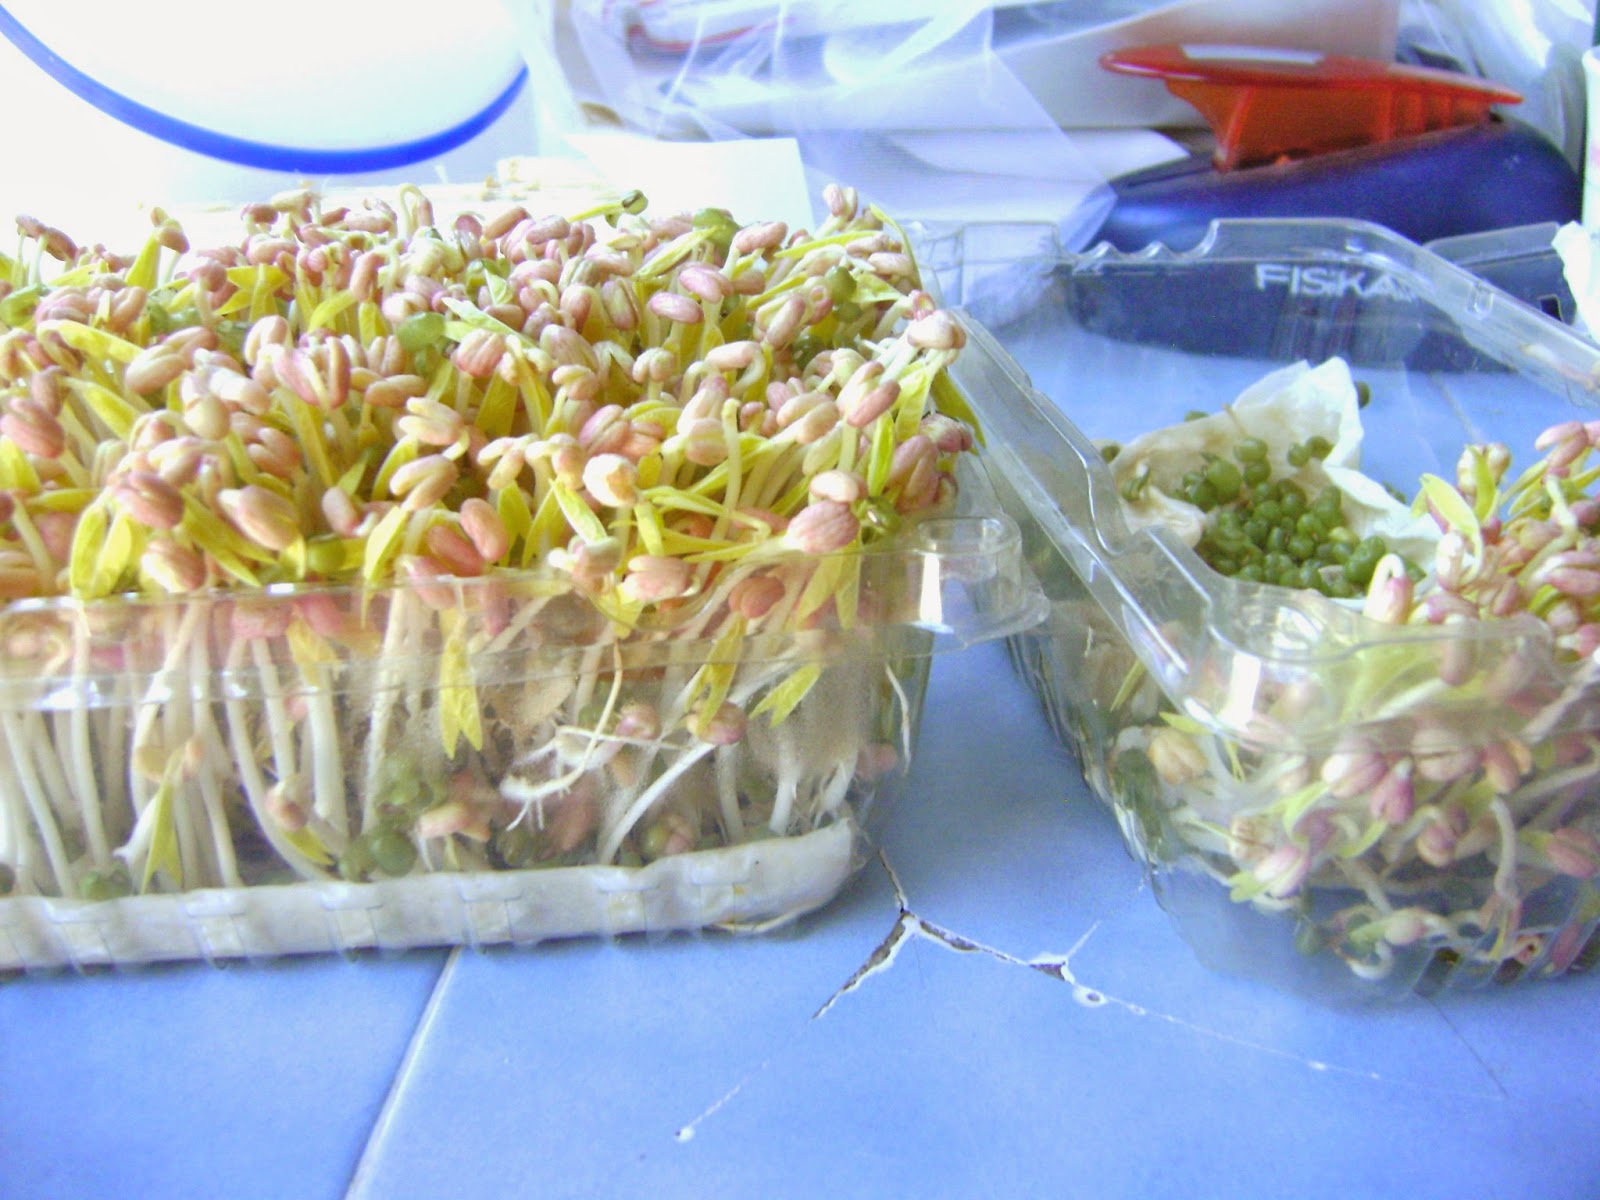
You'll notice that the second clamshell is nearly empty. That's because of snacking - my kids eat the hell out of these. They're good in stir frys, but great on salads and sandwiches too. My favorite is a slice of cheese, onion, and bean sprouts on rye. Nom.

I'm not going to bore you with pics of the alfalfa and mixed green sprouts in jars, but I also tried the French Garden Microgreens from sproutpeople.org in a tray with a mix of soil and Orbeez. The Orbees are a superabsorbent polymer originally developed to retain water in agriculture. I used two packets (300 Orbeez) mixed with potting soil, and about a pint of water in a tray 1" deep, soaked all day, and then spread with a tablespoon of soaked seeds:

Then, I sprayed them several times per day with water, and 7 days later, this:

They're adorable and tasty, but I'll probably stick to sprouting in jars for these little guys. Using the Orbeez was effective though, they did provide a sort of drainage that made it possible to grow microgreens without fancy trays - these are just grown in a recycled container with no drainage holes.

So there it is, my sprouts and microgreens. If you like fresh greens, but have a black thumb, these are just the best. My beans came from bulkfoods.com, and the alfalfa and salad mix from sproutpeople.org. I'm enjoying all the sprouts, and love knowing that when Winter comes, I can still grow fresh salad. :)

Friday, June 20, 2014

Lazy Summer

It's Summer, and for me it's a time when the business slows down a bit and I can do other things. However, I'm really pretty lazy at heart, so I'm doing lazy things. Knitting and gardening mostly, with a bit of baking too. And I'm finally posting again on my blog too - it keeps me on my chair under the AC.

I have a new pattern I thought about selling in my shop, but free patterns are fun too, so here's my cotton hat:

Made with a single ball of I Love This Cotton from Hobby Lobby, this hat is airy and suitable for Summer. If you're like me and too lazy to do your hair, a winner for sure.

You'll need:
120 yards of worsted weight yarn
Size 8 or 9 US sixteen inch circular needle
One set of DPN's in same size as circular
scissors, yarn needle, and stitch marker

TO begin, cast on 72 stitches loosely, a long tail cast on is best for stretchy-ness. Place your marker at the beginning of the row so you'll know where it ends and begins.

Knit 6-8 rows in k2, p2 rib.

For the body of the hat:

Row 1: knit around
Row 2: *yo, k4*
Row 3:*yo, drop yo from previous row from needle (do not work), s1 knit wise, k3, pass slipped stitch over the three knit stitches*
Row 4: knit around

Repeat pattern rows 5-6 times (I did 5 for the hat in the picture)

Repeat row 1-3 of pattern once more

Decrease rows
Row 1: *k6, k2tog*(63)
Row 2: *k5, k2tog*(54)
Row 3: *yo, k4, k2tog*(54)
Row 4: *yo, drop yo from previous row from needle (do not work), s1 knit wise, k2, k2tog, pass slipped stitch over the two knit and one ktog*(36)
Row 5: *k2, k2tog* (27)
Row 6: *k1, k2tog* (18)
Row 7: *k2tog* (9)

Cut yarn with a 12 inch tail, thread it onto your yarn needle, and pass through those last nine stitches. Pull it tight, and then fasten off and weave in the ends - ta da! A hat! A size 8 needle will make a hat to fit most adult women - if you need a bit more room, go up to a nine, or if you're knitting for a teen or kiddo, you can go down to a six. Just make sure that the ribbing at the brim fits, the body of the hat is stretchy so gauge isn't crucial.

Monday, May 20, 2013

Homemade Crackers That Actually Crunch


I know it's been awhile, and I'm sorry it's been so long since I updated. So I brought you something nice. Here it is:

I have looked far and wide on the internet for a decent homemade cracker recipe. Every one* reminded me of that Pinterest Fail blog - the recipes are never, ever as good as the pictures, and don't seem to crunch until they're burnt. And then, they're burnt.
*(okay, I only tried three, but they were all pretty much the same)

So, I tried again, using my own recipe. And voila! FAILURE! The same chewy, not quite crackers that every other "bake at 400 degrees for 15 minutes" recipe produces. Bleh. I'm pretty sure most of those recipes are planted online by Nabisco, so you'll keep on buying their trans-fat chemical crunchy delicious crackers.

But then, I remembered my friend, biscotti. So crunchy, and yet not rolled out super thin. So, I popped those guys back in the oven for 25 minutes at 250 degrees, and it was magic. There are a few things to keep in mind when making crackers, to make them awesome:
1. Do roll them out thin. Thinness in a cracker is the difference between crispy and "you broke a tooth".
2. Do not abuse the dough. No kneading. NONE. I use Blue Bird flour, which is a low gluten flour that you can really only get here in New Mexico, but you should be fine with all purpose flour, just don't knead it. Or, you can also use cake or pastry flour, but it doesn't have to be fancy like that.
3. You really have to have parchment paper. Trust me on this.

You can use any recipe or change this one up, and it will work if you use the double baking method to crunch them up. Increasing the amount of fat, and adding a bit of baking powder will also make them a bit more "Ritz Cracker" than "Wheat Thin". For this recipe, you would add 1/2 tsp. baking powder, and up to 6 Tbs. of oil instead of 3. Also, transfats are the devil, but they do increase the shelf life of foods - so if you can't eat these within 3 days, using Crisco or Butter Flavor Crisco will keep them good for a couple of weeks.

Homemade Crackers Recipe

2 cups flour (white, wheat, rye, or a combination)
3/4 tsp. salt
1 Tbs. sugar
1/2 tsp. baking powder (optional)
3 Tbs. room temperature butter (or shortening, or olive oil, or nut oil)
3/4 cup water (or milk is good too)
extra flour for rolling out the dough
sprinkles (sea salt, kosher salt, poppy seeds, sesame seeds, Parmesan cheese or whatever)

Mix all dry ingredients together in a bowl. Cut in the solid fats, if using solids, until it looks like corn meal. You can use a pastry cutter, a fork, or your hands to mix in the solid fats. If using liquid fats, mix them in a separate bowl with the water. Add the liquid all at once, and mix with a fork, just until the liquid is absorbed. If there's still dry flour on the bottom, you can add up to 1/4 cup more water so that can be all mixed in and moistened. Smush your dough together into a ball, and then put it in a zip lock bag. Refrigerate at least 2 hours, or overnight. Take the dough out of the fridge, and divide it into 4 equal balls. Cut a couple of pieces of parchment paper to fit a cookie sheet. Sprinkle the paper with flour, and with a heavy rolling pin, roll out one ball of dough directly on the parchment paper. If it's a bit sticky, just use more flour so it doesn't stick to your rolling pin. It's okay if it sticks to the paper, and it probably will. Roll it as thin as you can, no more than 1/8" thick. Sprinkle generously with your sprinkles. With a sharp knife or pizza cutter, cut your rolled dough into squares, 1-2" wide, and then pick up the whole piece of parchment paper with the crackers on it, put it on the cookie sheet, and bake in a 400 degree oven for 10-13 minutes, until lightly browned. When done, set your crackers aside and repeat with the other 3 balls of dough. You can be rolling out the next ball on a parchment sheet while the previous one is cooking. Then, turn the oven down to 250 degrees, and put all the crackers on the cookie sheet without the parchment paper. Spread them out, but it's okay if they're crowded up on there. Bake for an additional 25 minutes, or until they are crunchy. Really thin crackers may be crunchy after just 15 minutes, thicker crackers may take up to 35 minutes. Makes about 100 crackers.

Tuesday, October 02, 2012

Halloween Goodies!


Happy Halloween, it's coming so quickly! I am, of course, having a sale in my soap shop, 15% off everything, and coupons are still good.

Now, to the important thing. I have made something new and different with pumpkin, I am very happy to share! Pumpkin sweet rolls. I use a bread machine to make all my bread doughs these days, but if you're doing it the hard way, you probably have the skills to make this recipe without me telling you how. These are instructions for us lazy folk!

Pumpkin Sweet Rolls

THE ROLLS
1/2 cup milk
1-1/4 cups cooked pumpkin (can be home canned/drained, which is what I used, or freshly cooked, or frozen, or from a can from the store. Or any winter squash)
1/4 cup water
5 Tbs. butter, cut up into bits
3 Tbs dark brown sugar
1-1/2 tsp. pumpkin pie spice
4-1/2 cups all purpose flour (you can sub in up to 2 cups white whole wheat for more whole grains. But seriously, if you're trying to eat healthy, perhaps this is not your recipe)
2 tsp. salt
2-1/2 tsp bread machine yeast, instant yeast, or quick acting yeast

THE FILLING
1/2 cup sugar
4 Tbs. Softened butter
2 tsp. cinnamon
1/2 cup walnuts
1/2 cup raisins or dried cranberries

THE FROSTING
4 oz. cream cheese
2 Tbs. butter
2 cups powdered sugar
1/2 tsp vanilla
2-4 Tbs. milk

First off, blend your pumpkin, milk, and water thoroughly in a blender, with a stick blender, or in a food processor until it's smooth. Add this puree and the rest of the ingredients for the rolls to your bread machine, according to its instructions, and set it to "DOUGH". When it is complete, roll the dough out into a 12" x 18" rectangle. Spread the butter across the rectangle, and then sprinkle with sugar, cinnamon, nuts and dried fruit, leaving at least a 2" margin along one of the long sides with no fillings. Roll up the rectangle so that the blank long edge is along the top, and pinch it to seal the roll along that edge. You should have a tube 18" long. Cut into 12 rolls, place in a buttered cookie sheet or large baking pan. Cover with plastic wrap or a tea towel and let rise 15-30 minutes. Bake in a 375 degree oven for 25-27 minutes. For the frosting, mix the butter and cream cheese, add sugar, vanilla, and mix until it's obvious that you need to add some milk. Add the milk a little at a time until you get the consistency you like. I like it thick, so I use just about 2-1/2 Tbs of the milk. Spread frosting and eat, makes 12 huge rolls. Happy Halloween!

Monday, September 03, 2012

I Am Better Off Now Than 4 Years Ago

This is normally where I share my new soapy stuff, and sometimes recipes. It hasn't been political here for years, but it is still my soapbox.

As the campaign season swings into high gear, many pundits are asking Reagan's old question, "Are you better off today than you were 4 years ago." A lot of political folk are having trouble saying yes to that question. I found this very surprising. The Great Recession began in December of 2007, and did not officially end until June of 2009. Four years ago, we were just coming off of a Summer when gas prices spiked at over $4.00/gallon, with crude oil prices hitting a record of $147/barrel. In September of 2008, we lost a quarter of a million jobs in this country, and we lost a total of 2.6 million jobs that year. In September 2008, Lehman Brothers went tits up, and the economy went into free fall. For the first time since 1928, we were actually in danger of a collapse of our banking system. Four years ago our economy, as a whole, was - to use a technical term, in the shitter.

So for the generic American, the question of "Are you better off?" has an obvious and emphatic answer - Yes. Of course. DUH.

I understand that the current progress of our economy is not like the artificial boom years that we experienced in the past, but only a complete moron would say that "slow progress" is worse than "financial meltdown and collapse". I am disgusted at the willful stupidity of people who say things are worse now than they were four years ago.

For this specific American, the question of being better off also has a simple answer, Hell YES! I was able to start my own business, and as the economy has recovered, my business has grown. I started selling my soaps and whatnot two years ago. The business has grown to the extent that I am not seeking another job. I made a job for myself. And, unlike all the small business people that the RNC brought out for their convention, I actually did it without any government loans. But I would never say that I did it without government help, and it would be the height of arrogance to say I did it all alone, to say "I built that." I depend heavily on the low shipping prices and excellent service that I get from the USPS. OUR postal service, not owned by any stockholders or individual. WE built that. I also depend upon our transportation infrastructure, which allows me to obtain quality supplies from around the globe. I'm also able to do this only because of the science degree that was paid for, in large part, with a Pell grant. And without the current growth in our economy, I wouldn't have anything. I sell a luxury product - a small luxury to be sure, but one that sells better with people who have a bit of extra cash for something special. Without a doubt, more people have that extra cash now than four years ago. I have a job that is secure, one that I can never have taken from me by a boss looking for a bonus, and one that pays more, every day.

The fact that the economy is better than it was in 2008 is obvious to me, but there are still many people who don't feel the recovery just yet. They're still drowning in debt that was piled up over the last decade of declining wages. They're still unemployed, or under employed. They still suffer. There will always be work to be done, always ways to improve our current situation. But the answer to those problems is not to return to the suck-fest that we were living in four years ago. I am better off than I was four years ago and the country is better off. I want every individual to be better off, and not just the ones who already have theirs. I want opportunity not just for people who start a business, but for people who work for a business, and people who work for all of us, as teachers, fire fighters, and even the bitches at the DMV. I look forward to another four years of progress.


Tuesday, July 31, 2012

Harvest is Coming!!

Today is Lugnasadh Eve, the festival of First Harvest! I have already been harvesting, many radishes, carrots, and lettuces, but my tomatoes are still on the vine. A quick shop update - this month is my second anniversary selling to folks online, and the official start of my business. So, in honor of the occasion, as well as harvest & my birthday (I am super duper old), everything in my shop is marked down 25% until 8/21. I'm also making new soaps daily, and rebatching things that have sold out. Also, the new whipped soaps will be ready in September. I've tweaked my formula yet again, I just love the lather that my shaving soaps make, so I've changed the whipped soap so it produces a more foamy lather, good for bathing or shaving.

Since it's First Harvest, I wanted to share a recipe as well! We've been enjoying some wonderful veggies from the garden and the market, and I've made up some new ways to make them quickly. Here's our favorite so far, which is pretty quick, hearty, and vegetarian!


Easy Lentil Stew (goes great with fresh crusty bread or biscuits)

1 lb. dried brown lentils, cooked and drained (reserve 1/2 for tacos later)
5 carrots, sliced
1 medium onion, medium dice
1 green bell pepper, diced
5 stalks celery, sliced
1 clove garlic, minced (or more, as desired)
6 fresh diced tomatoes, or two cans diced tomatoes, or one quart home canned tomatoes
1 quart water
1 tsp. ground cumin
1 tsp. ground turmeric
2 Knorr vegetable bouillon cubes
1 Knorr garlic bouillon cube
1 Knorr cilantro bouillon cube
and/or 3 Tbs. fresh minced cilantro
2 Tbs oil of choice (butter, olive oil, or coconut oil work great)
Any vegetables you desire can be added with the tomatoes - if you have kale, chard, chard stems, turnips, daikon, potatoes, or any other fab farmer's market find, just chop it and throw it in :)

In a medium stock pot, heat oil until it is melted and hot. Add ground cumin, stir to incorporate, until it smells awesome. Add carrots, bell pepper, and celery. Stir and fry on medium high heat until onions are translucent. Add garlic, stir & fry one more minute. Add 1/2 the cooked lentils, tomatoes, water, bouillon cubes, and turmeric. Bring to a boil, then turn down to low, cover, and simmer for 1-3 hours, stirring occasionally. Add fresh cilantro if desired just before serving, serves 6.

Monday, April 30, 2012

New Things to Come

I love Spring, it's my most creative time of the year! I do actually get most of my new ideas in the Springtime, and save them up for the rest of the year. I've been fiddling about for something to replace my whipped body butters, as they can't ship in the Summer - too melty. So I made a thing for you. And for me too.
It's a new all purpose balm. Seriously, all purposes. Lips, hella yeah. Dry heels, yep. Need to grease a cake pan, okay then, but it's a little pricy. It's a rich balm with hemp seed oil, jojoba, cocoa butter & shea butter, with a blend of tea tree, lavender, rosemary, and chamomile essential oils - the scent is very mild, and mostly chamomile. Safe for use on babies, mommies, and cakes. It will probably still melt, but since it's not whippy, when it cools back down, it will be exactly the same as when I shipped it, so yay for no heat damage.
And - new soaps on the rack to be released this month (from left to right in the pic):

Sweet Pipe Tobacco - sweet and masculine, this is a scent exactly like my Dad's pipe tobacco (my Mom used to keep her sewing notions in his empty Borkum Riff cans, so to me, this soap smells like buttons) .

Honey Bear - made with 100% natural ingredients, including honey, natural honey fragrance, and just a bit 'o beeswax up top.

Babylon - a blend of honeyed figs, pomegranate, frankincense, myrrh, and just a bit of musk and patchouli. This scent will also be available as a perfume oil, body spray, and body cream. .

Poached Pear - sweet juicy pear with a little vanilla glaze.


The Sweet Pipe Tobacco and Honey Bear have been on the rack for a couple of weeks, so they'll be available by the 11th, and Babylon and Poached Pear will follow on the 18th. I'll also be introducing a limited group of Supernatural All Natural Lip Balms, in a slide tin, and a few more colors for the lip glosses. And there will be golden beets and dragon (red) carrots in my garden, Spring is AWESOME!!

Tuesday, April 17, 2012

The New Stuff


I have lots of new things planned for the shop this Summer. I have new Summer hats in my knitting shop, KnitHabit, made with acrylic or cotton yarns, your choice. The visor hats have a good shade, and are really lightweight. And a million times cuter than a trucker hat :)
And, in the soap shop, there's lots of new things coming, and here's some of the scheduled releases:
4/19 - All Natural Facial Scrub with ground walnut and apricot shells - made with tea tree oil and lavender essential oil, good for all skin types. A gentle exfoliator that won't dry you out or leave you greasy.
4/23 - Cherry Blossom Sea Salt Soap
5/5 - All Natural Citrus Soap and Fruit Loops Soap: Both of these are new cold process soaps, the citrus is all natural with pink grapefruit, sweet orange, and blood orange essential oils, and the Fruit Loops is a fun soap with bright colors, and the scent of MY FAVORITE BREAKFAST EVER.

I'm also working on a formula for a great vegan shaving soap, and hoping for success by June. And, I have a dozen vintage double edged razors that I'm still restoring to add to the shop for Father's Day. I'll have a couple of gift sets available, full of handmade and vintage goodies for Dad :)

Friday, March 09, 2012

I Stepped in a Big Pile of Sh..


SHAVING CREAM!! I always loved the shaving cream song. I also have to admit, that even though I don't shave (being a lady), I love shaving cream. I love coating the neighbor's car with the stuff, spraying it on strangers, and making Devil's Tower sculptures with the stuff, it's a miracle in a can. Several months ago, I had a customer ask if I knew about shaving soaps, and could I make some. And I had to tell him, I know nothing about shaving. Nothing. Most of the men in my family are too lazy to use anything but Norelco to defur their faces, if they even bother with that. I do have two sons of hair growing age, and since they have to do what I tell them, they've been my guinea pigs. I made them after all.
I started off with what I already had on hand - testing all of my soap formulas, cream soaps, and shampoo bars. My old cream soap formula did really well - I had abandoned it as a cream soap because most people want a more bubbly lather. Shavers like the creamy foam. Also a good performer, my shampoo bars, but the lather tended to dry quickly, so you have to add more water for 2nd or 3rd pass. A slick shave, but a lot of work - you basically have to build a new lather for each pass. And, it didn't do as well for making whiskers stand up, so I needed more backbone.
Then off to the research - there's a community online for every hobby, and shaving appears to be a big one. I think I read every post on a couple of the bigger forums, that was a lot of reading. I identified oils that weren't previously part of my starring lineup, but are must haves for super awesome shaving soap - stearic acid, tallow, and palm oil. I also had a chance to look at some antique soap making books, and I had to take a look at the ingredients being used in the most awesome shaving soaps. And then I figured out how to get all that stuff into one bar :)
The scents that I picked for the shaving soaps were either 1)requested by customers (pineapple & patchouli)2)super popular with lots of guys on the shaving forums (lavender & sandalwood) or 3)my favorite smell ever(caramel hazelnut).
My sons are happy with the results - they work better than canned shaving cream (duh), and seem to do a great job preventing nicks. Also, teenaged son is experiencing less acne, so yay!
I'll be selling these with a jar and also without. The jar makes a nice shaving bowl, safe in the shower, and has a metal lid so it's great for traveling. Happy shaving!

Tuesday, January 31, 2012

The Great Salt Bar Experiment


Since the day after Christmas, I've been involved in what I think of as "The Great Salt Bar Experiment". I don't know if you've ever heard of salt bars, or salt soap, but I've been intrigued by them for years. I started off with a pretty basic recipe, just coconut oil, sea salt, and lye. I did the first attempt with 15% superfat, and hot processed the soap with a full 40% water usage. I added the salt (equal to the weight of coconut oil) after cooking the soap. Interesting, and very nice results! I expected it to either be greasy from the extra oils, or drying, because coconut + salt. What a surprise for me! I unmolded & sliced that first batch after just an hour in the mold, when it was cool enough to handle. It was already very, very hard, and crumbled a bit. The lather wasn't the normal bubbles - more of a creamy foam. It left my skin very soft, but not greasy. After the first use, the bar was very smooth, and rock like. When I used it a second time, I was about to be disappointed, no lather! But then it suddenly burst into foam, yay! I tweaked my formula, adding castor oil, rice bran oil, and cocoa butter, and made several loaves, some hot process and some cold process, and a couple of CPOP. While the soap itself is the same regardless of the process, my favorites were the cold process soaps - they looked the prettiest, but did have to go through four weeks of cure time.
I also tried these out as a shampoo bar - with the high coconut content, I thought they might be a winner on hair. Too much coconut for my hair, which is really fine. After washing with one of the caramel bars, I could tell immediately it was a fail for me, a little oily. So, I lathered up with one of my normal shampoo bars (lemon rosemary), and rinsed. OMG - it felt like I had used a conditioner, even though I hadn't even spritzed with vinegar, very soft, no frizz :) Kind of a weird thing, to use conditioner before shampoo, but it works! I've made more of these since the initial experiments, so there will be more variety in the shop in the coming month(s), but the first ten varieties are ready and available now. On the curing rack, I have blueberry, mango and bay rum that will be ready after Valentine's, and will be adding new scents throughout the Spring.